Vue
-
Vue(/vjuː/ 로 발음, view 와 발음이 같습니다.)는 사용자 인터페이스를 만들기 위한 프로그레시브 프레임워크 입니다. 다른 단일형 프레임워크와 달리 Vue는 점진적으로 채택할 수 있도록 설계하였습니다. 핵심 라이브러리는 뷰 레이어만 초점을 맞추어 다른 라이브러리나 기존 프로젝트와의 통합이 매우 쉽습니다. 그리고 Vue는 현대적 도구 및 지원하는 라이브러리와 함께 사용한다면 정교한 단일 페이지 응용프로그램을 완벽하게 지원할 수 있습니다
-
: for v-bind:, @ for v-on: and # for v-slot
목차
- Vue CLI
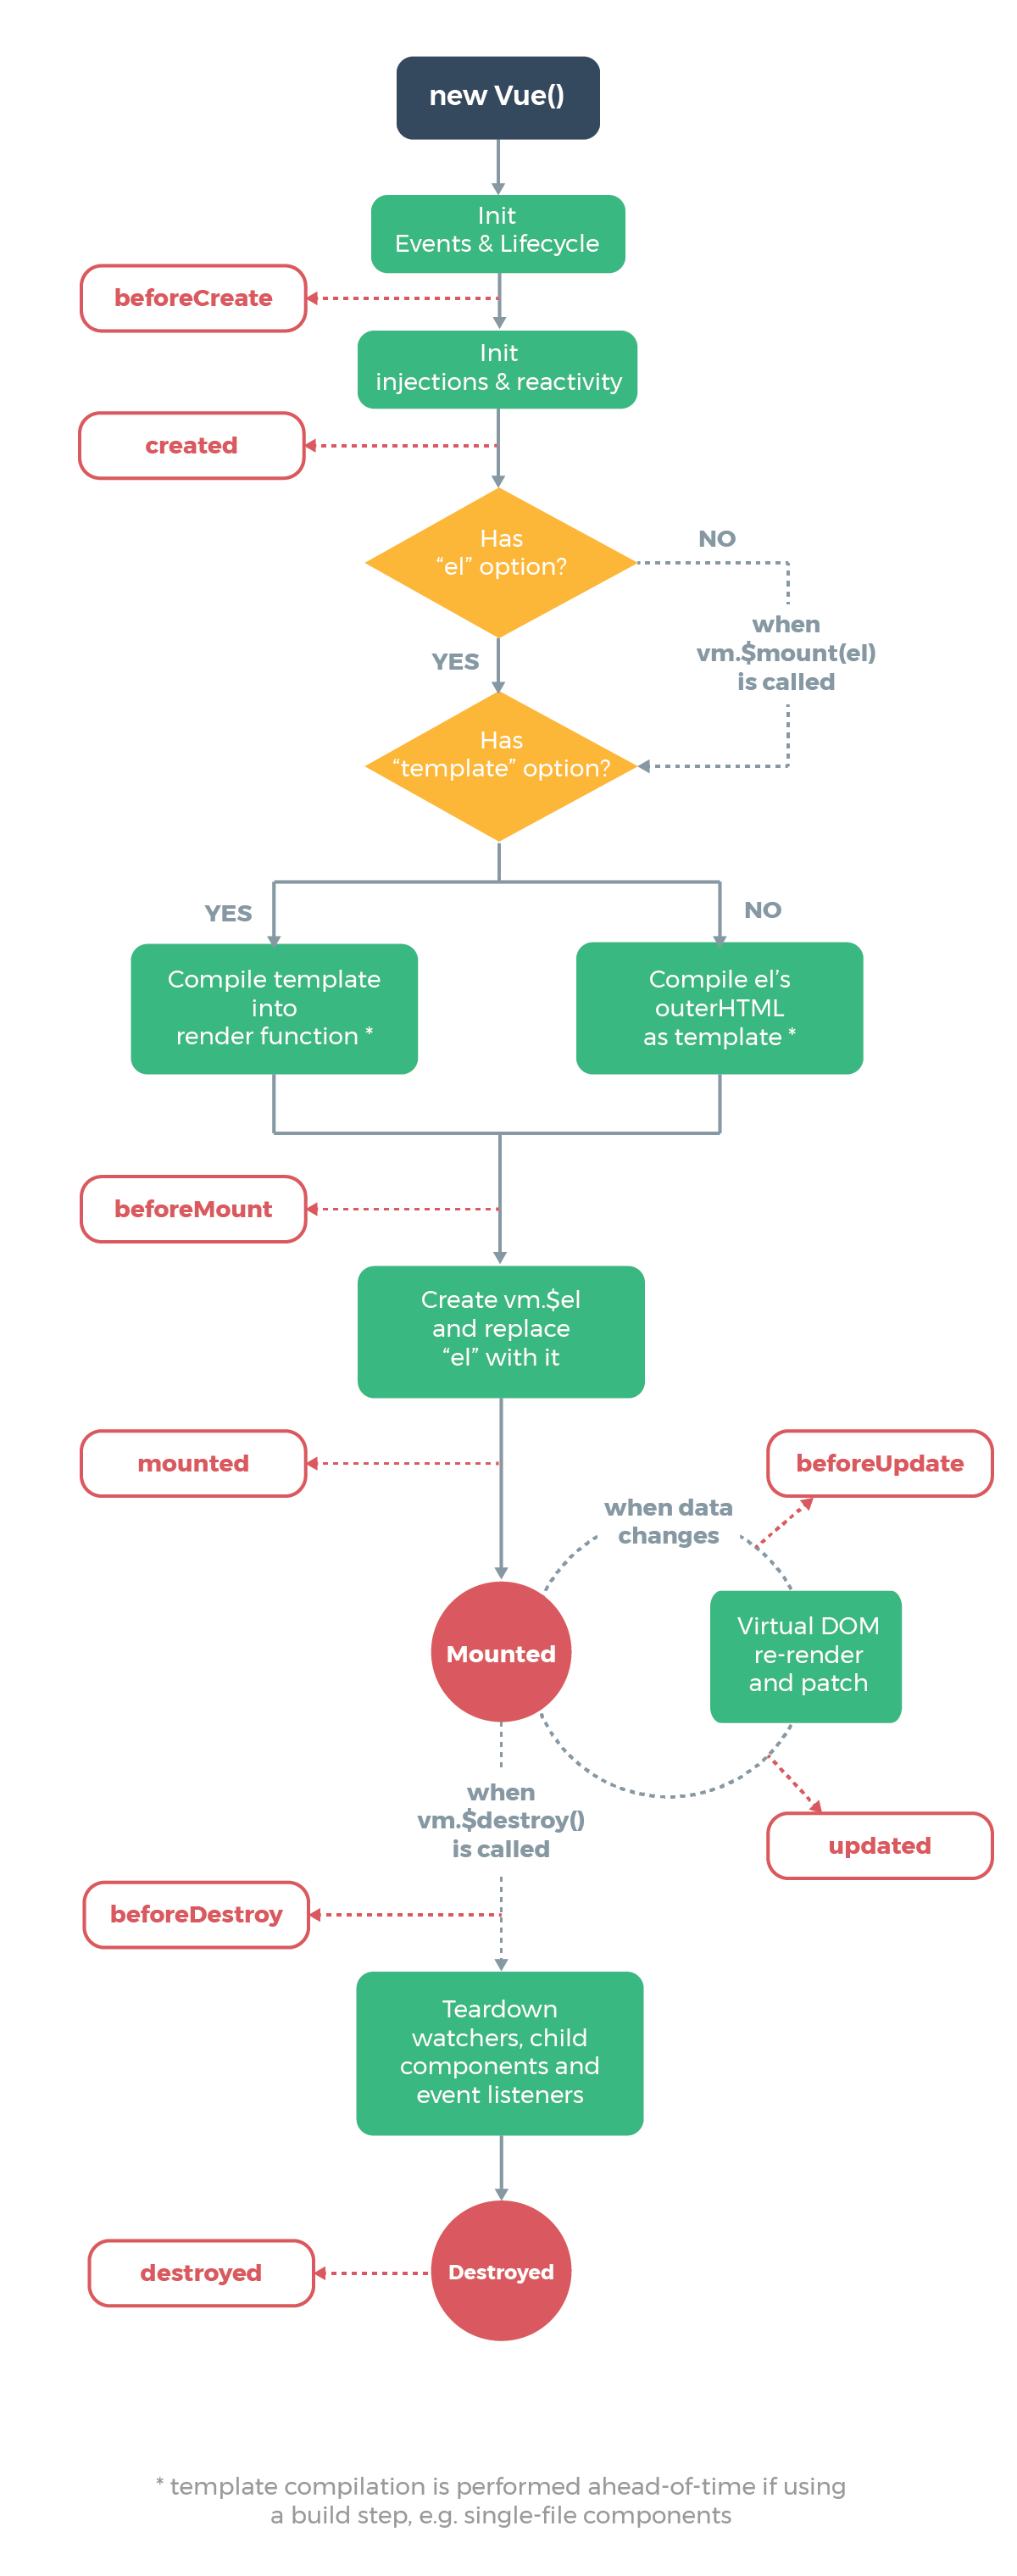
- life cycle
- Vue 인스턴스 생성하기
- 뷰 데이터와 메소드
- 데이터 바인딩
- 이벤트 메소드
- 인스턴스 라이프사이클 훅
- 데이터 양방향 바인딩
- computed
- watch
- 클래스와 스타일 바인딩
- 조건부 렌더링 v-if,v-show
- 리스트 렌더링 v-for
- 컴포넌트
- 뷰 라우터
- 싱글 파일 컴포넌트
- Props
- Slot
- Vuex
- Vuex Modules
- forceUpdate
- 참고
-
Vue CLI
- npm install -g @vue/cli (sudo npm install -g @vue/cli)
- vue create projectname
- Manuually select features
- Router, Vuex
-
npx @vue/cli create projectname
- document https://cli.vuejs.org/guide/creating-a-project.html
life cycle
Vue 인스턴스 생성하기
- new Vue()
<!DOCTYPE html>
<html lang="en">
<head>
    <meta charset="UTF-8">
    <meta name="viewport" content="width=device-width, initial-scale=1.0">
    <meta http-equiv="X-UA-Compatible" content="ie=edge">
    <title>뷰 기초 익히기</title>
    <script src="https://cdn.jsdelivr.net/npm/vue/dist/vue.js"></script>
</head>
<body>
    <div id="app">

    </div>
    <script>
        new Vue({
            el: '#app',
            data: {
                name: '코지 코더'
            }
        })
    </script>
</body>
</html>
스크립트 상세
- 프로덕션 환경인 경우 새 버전에서 예상치 못한 오류를 방지하려면 특정 버전의 빌드 파일을 추가하는것을 추천합니다.
<script src="https://cdn.jsdelivr.net/npm/vue@2.6.0"></script>
뷰 데이터와 메소드
<!DOCTYPE html>
<html lang="en">
<head>
    <meta charset="UTF-8">
    <meta name="viewport" content="width=device-width, initial-scale=1.0">
    <meta http-equiv="X-UA-Compatible" content="ie=edge">
    <title>뷰 기초 익히기</title>
    <script src="https://cdn.jsdelivr.net/npm/vue/dist/vue.js"></script>
</head>
<body>
    <div id="app">

    </div>
    <script>
        new Vue({
            el: '#app',
            data: {
                person: {
                    name: '코지 코더',
                    age: 34
                },
                inputData: 'hello',
                type: 'text',
                link: 'https://www.youtube.com/'
            },
            methods: {
                nextYear(greeting) {
                    return greeting + '! ' +this.person.name + ' 는 내년에 ' + (this.person.age + 1) + '살 입니다';
                },
                otherMethod: function() {
                    this.nextYear();
                },
                getKossieCoderLink(channel) {
                    return this.link + channel;
                }
            }
        })
    </script>
</body>
</html>
데이터 바인딩
- v-bind: ==> :
<!DOCTYPE html>
<html lang="en">
<head>
    <meta charset="UTF-8">
    <meta name="viewport" content="width=device-width, initial-scale=1.0">
    <meta http-equiv="X-UA-Compatible" content="ie=edge">
    <title>뷰 기초 익히기</title>
    <script src="https://cdn.jsdelivr.net/npm/vue/dist/vue.js"></script>
</head>
<body>
    <div id="app">

        <input :type="type" :value="inputData">
        <a :href="getKossieCoderLink('kossiecoder')">코지 코더 채널</a>
    </div>
    <script>
        new Vue({
            el: '#app',
            data: {
                person: {
                    name: '코지 코더',
                    age: 34
                },
                inputData: 'hello',
                type: 'text',
                link: 'https://www.youtube.com/'
            },
            methods: {
                getKossieCoderLink(channel) {
                    return this.link + channel;
                },
                nextYear(greeting) {
                    return greeting + '! ' +this.person.name + ' 는 내년에 ' + (this.person.age + 1) + '살 입니다';
                },
                otherMethod: function() {
                    this.nextYear();
                }
            }
        })
    </script>
</body>
</html>
이벤트 메소드
- v-on: v-on 이벤트의 축약 @ 아래처럼 v-on:click을 쓰지않고 @click을 써도 똑같은 효과가 나온다. v-on은 자주 쓰이는 것이기 때문에 쉽게 쓰라고 축약형인 @를 만들어두었다.
<div id="example-2">
  <!-- `greet`는 메소드 이름으로 아래에 정의되어 있습니다 -->
  <button v-on:click="greet">Greet</button>
</div>

<div id="example-3">
  <button v-on:click="say('hi')">Say hi</button>
  <button v-on:click="say('what')">Say what</button>
</div>
이벤트 수식어 v-on:click v-on:scroll
    .stop
    .prevent
    .capture
    .self
    .once
    .passive
키 수식어 v-on:keyup
    .enter
    .tab
    .delete (“Delete” 와 “Backspace” 키 모두를 캡처합니다)
    .esc
    .space
    .up
    .down
    .left
    .right
    .page-down
시스템 수식어 키 목록
    .ctrl
    .alt
    .shift
    .meta
.exact 수식어
.exact
마우스 버튼 수식어
    .left
    .right
    .middle
인스턴스 라이프사이클 훅
  beforeCreate() {
    console.log("beforeCreate");
  },
  created() {
    console.log("created");
  },
  beforeMount() {
    console.log("beforeMount");
  },
  mounted() {
    console.log("mounted");
  },
  beforeUpdate() {
    // console.log("beforeUpdate");
  },
  updated() {
    // console.log("updated");
  },
  beforeDestroy() {
    console.log("beforeDestroy");
  },
  destroyed() {
    console.log("beforeDestroy");
  },
  watch: {
    inputData() {
      console.log(this.input1);
    },
    type() {},
  },
데이터 양방향 바인딩
    <!-- <input type="text" :value="text" @keyup="updateText"><br> -->
    <input type="text" v-model="text"><br>
    <br>
computed
- 템플릿 내에 표현식을 넣으면 편리합니다. 하지만 간단한 연산일 때만 이용하는 것이 좋습니다. 너무 많은 연산을 템플릿 안에서 하면 코드가 비대해지고 유지보수가 어렵습니다
- computed 속성의 캐싱 vs 메소드차이점은 computed 속성은 종속 대상을 따라 저장(캐싱)된다는 것
<!DOCTYPE html>
<html lang="en">
<head>
    <meta charset="UTF-8">
    <meta name="viewport" content="width=device-width, initial-scale=1.0">
    <meta http-equiv="X-UA-Compatible" content="ie=edge">
    <title>뷰 기초 익히기</title>
    <script src="https://cdn.jsdelivr.net/npm/vue/dist/vue.js"></script>
</head>
<body>
    <div id="app">
        <button @click="changeMessage">Clcik</button>


    </div>
    <script>
        new Vue({
            el: '#app',
            data: {
               message: '헬로우'
            },
            methods: {
                changeMessage() {
                    this.message = '코지코더';
                }
            },
            computed: {
                reversedMessage() {
                    return this.message.split('').reverse().join('')
                }
            }
        })
    </script>
</body>
</html>
watch
- 대부분의 경우 computed 속성이 더 적합하지만 사용자가 만든 감시자가 필요한 경우가 있습니다. 그래서 Vue는 watch 옵션을 통해 데이터 변경에 반응하는 보다 일반적인 방법을 제공합니다. 이는 데이터 변경에 대한 응답으로 비동기식 또는 시간이 많이 소요되는 조작을 수행하려는 경우에 가장 유용합니다.
- watch 옵션 외에도 명령형 vm.$watch API를 사용할 수 있습니다
<!DOCTYPE html>
<html lang="en">
<head>
    <meta charset="UTF-8">
    <meta name="viewport" content="width=device-width, initial-scale=1.0">
    <meta http-equiv="X-UA-Compatible" content="ie=edge">
    <title>뷰 기초 익히기</title>
    <script src="https://cdn.jsdelivr.net/npm/vue/dist/vue.js"></script>
</head>
<body>
    <div id="app">
        <br>
        <button @click="changeMessage">Click</button><br>

    </div>
    <script>
        new Vue({
            el: '#app',
            data: {
               message: '헬로우',
               updated: '아니요'
            },
            methods: {
                changeMessage() {
                    this.message = '코지코더';
                }
            },
            computed: {
                reversedMessage() {
                    return this.message.split('').reverse().join('')
                }
            },
            watch: {
                message(newVal, oldVal) {
                    console.log(newVal, oldVal);
                    this.updated = '네';
                }
            }
        })
    </script>
</body>
</html>
클래스와 스타일 바인딩
- Class, Style 바인딩
<!DOCTYPE html>
<html lang="en">
<head>
    <meta charset="UTF-8">
    <meta name="viewport" content="width=device-width, initial-scale=1.0">
    <meta http-equiv="X-UA-Compatible" content="ie=edge">
    <title>뷰 기초 익히기</title>
    <style>
        .red {
            color: red;
        }

        .font-bold {
            font-weight: bold;
        }
    </style>
    <script src="https://cdn.jsdelivr.net/npm/vue/dist/vue.js"></script>
</head>
<body>
    <div id="app">
        <div :style="{ color: red, fontSize: size}">Hello</div>

        <div :class="{ red: isRed, 'font-bold': isBold}">Hello</div>
        <button @click="update">Click</button>
    </div>
    <script>
        new Vue({
            el: '#app',
            data: {
                isRed: false,
                isBold: false,
                red: 'red',
                size: '30px'
            },
            methods: {
                update() {
                    this.isRed = !this.isRed;
                    this.isBold = !this.isBold;
                }
            },
        })
    </script>
</body>
</html>
조건부 렌더링 v-if,v-show
- v-if, v-else, v-else-if
- v-show : 차이점은 v-show가 있는 엘리먼트는 항상 렌더링 되고 DOM에 남아있다는 점입니다. v-show는 단순히 엘리먼트에 display CSS 속성을 토글합니다
<template v-if="number === 1">
    <div>1</div>
    <div>2</div>
    <div>3</div>
</template>
<div v-else-if="number === 2">Hi</div>
<div v-else>No</div>

<div v-show="show">Yes</div>
리스트 렌더링 v-for
<li v-for="item in items">
<li v-for="(item, index) in items">
<div v-for="(value, name) in object">
<div v-for="(value, name, index) in object">
- key에 대한 이상적인 값은 각 항목을 식별할 수 있는 고유한 ID
- 2.2.0 이상에서 v-for는 key 가 필수 입니다.
<div v-for="item in items" v-bind:key="item.id">
  <!-- content -->
</div>
컴포넌트
- 전역 등록
<my-component></my-component>

new Vue({
  el: '#some-element',
  // 옵션
})


Vue.component('my-component', {
  // 옵션
})
- 지역 등록
<my-component></my-component>

var Child = {
  template: '<div>사용자 정의 컴포넌트 입니다!</div>'
}

new Vue({
  // ...
  components: {
    // <my-component> 는 상위 템플릿에서만 사용할 수 있습니다.
    'my-component': Child
  }
})

- 컴포넌트 호출 시 이름 확장

아래에서 Content 컴포넌트를 app-content로 호출했는데, 이를 CamelCase로 기본으로 호출하면 동일하게 사용할 수 있다.

즉, "app-content" 대신에 appContent로 호출하면, <appContent></appContent>로도 사용할 수 있지만, <app-content></app-content>로도 사용이 가능하다.

```JavaScript

<template>
	<div>
		<h1></h1>
		<app-content></app-content>
	</div>
</template>

<script>
import Content from './Content.vue';

export default {
	components: {
		'app-content': Content
	},
	data: function() {
		  return {
			  title: "Hello World"
		  }
	}
}
</script>
뷰 라우터
- main.js
import Vue from 'vue'
import App from './App.vue'
import router from './router'
import store from './store'

Vue.config.productionTip = false

new Vue({
  router,
  store,
  render: h => h(App)
}).$mount('#app')
- App.vue
<template>
  <div id="app">
    <div id="nav">
      <router-link to="/">Home!</router-link> |
      <router-link to="/about">About!!!</router-link>
    </div>
    <router-view/>
  </div>
</template>
싱글 파일 컴포넌트
- temp.vue
<template>
    <div>
        <p></p><br>
        <button @click="updateName">Change Name</button>
    </div>
</template>

<script>
export default {
    data() {
        return {
            name: 'name',
        }
    },
    methods: {
        updateName() {
            this.name = 'name Updated';
        }
    }
}
</script>

<style scoped>
</style>
- Home.vue
<template>
  <div>
    <h1>This is Home page</h1>
    <Temp />
  </div>
</template>

<script>
import Temp from '@/components/temp.vue';
export default {
  components: {
    Temp
  },
  data() {
    return {
      name: 'test'
    }
  }
}
</script>

<style scoped>
h1 {
  color: red;
}
</style>
Props
- 모든 컴포넌트 인스턴스에는 자체 격리 된 범위 가 있습니다. 즉, 하위 컴포넌트의 템플릿에서 상위 데이터를 직접 참조 할 수 없으며 그렇게 해서는 안됩니다. 데이터는 props 옵션 을 사용하여 하위 컴포넌트로 전달 될 수 있습니다.
<child message="안녕하세요!"></child>
- required, default
-
String, Number, Boolean, Function, Object, Array, sSymbol
-
$on(eventName)을 사용하여 이벤트를 감지 하십시오. 부모 컴포넌트는 자식 컴포넌트가 사용되는 템플릿에서 직접 v-on 을 사용하여 자식 컴포넌트에서 보내진 이벤트를 청취할 수 있습니다.
- $emit(eventName)을 사용하여 이벤트를 트리거 하십시오.
Slot
- 단일 슬롯
- my-component

<div>
  <h2>나는 자식 컴포넌트의 제목입니다</h2>
  <slot></slot>
</div>

- main
<div>
  <h1>나는 부모 컴포넌트의 제목입니다</h1>
  <my-component>
    <p>이것은 원본 컨텐츠 입니다.</p>
    <p>이것은 원본 중 추가 컨텐츠 입니다</p>
  </my-component>
</div>
- 이름을 가지는 슬롯
- app-layout 컴포넌트
<div class="container">
  <header>
    <slot name="header"></slot>
  </header>
  <main>
    <slot></slot>
  </main>
  <footer>
    <slot name="footer"></slot>
  </footer>
</div>

- main
<app-layout>
  <h1 slot="header">여기에 페이지 제목이 위치합니다</h1>

  <p>메인 컨텐츠의 단락입니다.</p>
  <p>하나 더 있습니다.</p>

  <p slot="footer">여기에 연락처 정보입니다.</p>
</app-layout>

- 랜더링 결과
<div class="container">
  <header>
    <h1>여기에 페이지 제목이 위치합니다</h1>
  </header>
  <main>
    <p>메인 컨텐츠의 단락입니다.</p>
    <p>하나 더 있습니다.</p>
  </main>
  <footer>
    <p>여기에 연락처 정보입니다.</p>
  </footer>
</div>
- 부모에 값 전달
- my-component
<template>
    <div>
        <p>header</p>
        <slot name="header" :message="answer"></slot>
        <p>Body</p>
        <slot></slot>
        <p>footer
        </p>
    </div>
</template>

- main
<template>
  <div class="about">
    <h1>This is an about page</h1>
    <my-component>
      <template #header="{ messages }">
        <p>header111 </p>
      </template>
      <!-- <template #header="props">
        <p>header111 </p>
      </template> -->
      <template #default>
        hello22
      </template>
    </my-component>
  </div>
</template>
Vuex
- Vuex는 Vue.js 애플리케이션에 대한 상태 관리 패턴 + 라이브러리 입니다. 애플리케이션의 모든 컴포넌트에 대한 중앙 집중식 저장소 역할을 하며 예측 가능한 방식으로 상태를 변경할 수 있습니다. 또한 Vue의 공식 devtools 확장 프로그램 (opens new window)과 통합되어 설정 시간이 필요 없는 디버깅 및 상태 스냅 샷 내보내기/가져오기와 같은 고급 기능을 제공합니다
- Vuex의 핵심구성은 State, Mutations, Actions, Getters로 구성되어 있습니다.
State
- state는 쉽게 말하면 프로젝트에서 공통으로 사용할 변수를 정의 합니다.
- 프로젝트 내의 모든 곳에서 참조 및 사용이 가능합니다.
- state를 통해 각 컴포넌트에서 동일한 값을 사용할 수 있습니다.
export const state = () => ({
  account: null,
  isAdmin: null,
  item: null
});
Mutations
- Mutations의 주요 목적은 state를 변경시키는 역활을 합니다. (Mutations을 통해서만 state를 변경해야 함)
- 비동기 처리가 아니라 동기처리를 합니다. 위의 함수가 실행되고 종료된 후 그 다음 아래의 함수가 실행됩니다.
- commit('함수명', '전달인자')으로 실행 시킬 수 있습니다.
- mutations 내에 함수 형태로 작성합니다.
export const mutations = {
  currentUser(state,  account) {
    state.account = account;  // state의 account변수에 넘겨 받은 account값을 입력함
  }
};
Actions
- Actions의 주요 목적은 Mutations를 실행시키는 역활을 합니다. Mutations이 실행되면 state도 변경이 되겠지요.
- 동기 처리가 아니라 비동기처리를 합니다. 순서에 상관없이 먼저 종료된 함수의 피드백을 받아 후속 처리를 하게 됩니다.
- dispatch(‘함수명’, ‘전달인자’)으로 실행 시킬 수 있습니다. ex) dispatch(‘함수명’, ‘전달인자’, {root:true})
- actions 내에 함수 형태로 작성합니다.
- 비동기 처리이기 때문에 콜백함수로 주로 작성합니다.
일반 형태로 실행
dispatch('setAccount', account );

export const actions = {
  setAccount({ commit, dispatch }, account) {
    commit('currentUser', account);
    dispatch('setIsAdmin', account.uid);
  }
}
Components에서 then()으로 콜백함수 실행
dispatch('setAccount', account ).then(() => {   });

export const actions = {
  setAccount({ commit }, account) {

    return new Promise((resolve, reject) => {
      setTimeout(() => {
        commit('currentUser', account);
        resolve()
      }, 1000)
    })

  }
}
Getters
- 각 Components의 계산된 속성(computed)의 공통 사용 정의라고 보시면 됩니다.
- 여러 Components에서 동일한 computed가 사용 될 경우 Getters에 정의하여 공통으로 쉽게 사용할 수 있습니다.
- 하위 모듈의 getters를 불러오기 위해서는 특이하게 this.$store.getters[“경로명/함수명”]; 을 사용해야 합니다.
export const getters = {
  isAuthenticated(state) { // 현재 로그인 상태인지 확인 (true/false)
    return !!state.user;
  },

  getAccount(state) {      // 회원정보 불러오기
    return state.account;
  },
};
Vuex 상태를 Vue 컴포넌트에서 가져오기
- store.js
import Vue from 'vue';
import Vuex from 'vuex';

Vue.use(Vuex);

export default new Vuex.Store({
    state: {

    },
    mutations: {

    },
    actions: {

    },
    getters: {

    }
});

- main.js
import Vue from 'vue'
import App from './App.vue'
import store from './store'

Vue.config.productionTip = false

new Vue({
  store,
  render: h => h(App),
}).$mount('#app')
state에 접근하는 방법
-
state에 접근하기 위해서는 Commponent의 computed 내에 작성을 해야 합니다.
- 기본 접근방법 : this.$store.state.items
- mapState 활용방법
  computed: {
    ...mapState({
      items: state => state.items,
    }),
Mutations에 접근하는 방법
-
Mutations을 실행하기 위해서는 Commponent의 methods 영역 내에 작성을 해야 합니다.
- 기본 접근방법 : this.$store.dispatch(‘경로명/함수명’)
- mapActions 활용방법
 methods: {  // methods영역에서 호출해야 함
    ...mapActions({
      add: 'item/increment' // this.add()를 this.$store.dispatch('item/increment')에 매핑합니다.
    })
  }
Actions에 접근하는 방법
-
Actions을 실행하기 위해서는 Commponent의 methods 영역 내에 작성을 해야 합니다.
- 기본 접근방법 : this.$store.dispatch(‘경로명/함수명’)
- mapActions 활용방법
methods: {  // methods영역에서 호출해야 함
    ...mapActions({
    add: 'item/increment' // this.add()를 this.$store.dispatch('item/increment')에 매핑합니다.
    })
}
Getters에 접근하는 방법
-
Getters을 실행하기 위해서는 Commponent의 computed 영역 내에 작성을 해야 합니다.
- 기본 접근방법 : this.$store.getters[“경로명/함수명”];, this.$store.getters.doneTodosCount, this.$store.getters.getTodoById(2)
- mapGetters 활용방법
 computed: {
    ...mapGetters({
      doneCount: 'item/doneTodosCount'
    })
  }
Vuex Modules
import Vue from 'vue';
import Vuex from 'vuex';
import todo from './modules/todo';
import user from './modules/user';

Vue.use(Vuex);

export default new Vuex.Store({
    modules: {
        todo,
        user
    }
});
모듈로 구성된 vuex에서 상위의 모듈에 있는 dispatch, commit를 실행시키는 방법
모듈로 구성할 경우 하위 모듈에서 형제 또는 부모 모듈의 state에 접근하기 위해서는 rootState를 사용하면 됩니다.
그러면 형제 또는 부모 모듈의 Mutations나 Actions를 실행시킬 경우는 어떻게 해야 하느냐!!!
세번쨰 인자에 { root: true }를 지정해 주면 됩니다

dispatch("path1/actionA", payload, { root: true });

이제 최상위 경로인 root에서 부터 하위로 경로를 찾아 들어갈 수있습니다.
commit도 위와 같이 처리가 가능합니다.

commit("path1/actionA", payload, { root: true });
forceUpdate
- Vue 선언된 data에 chiledren 추가시 렌더링이 안될 때
- data가 이미 정의 되어있고 나중에 데이터를 추가하면 observer가 생성되지 않아 데이터가 갱신이 되어도 DOM이 업데이트가 안 된다.
new Vue({
  el: '#memberList',
  data: {
    members: [{ id: 1, name: 'gracefullight' }],
  },

  mounted: function () {
    /* member의 logs 데이터는 그냥 배열로 선언된다. */
    this.members[0].logs = [];
    /* 데이터를 넣어도 위 템플릿의 <li> 부분이 반복되지 않는다. */
    this.members[0].logs = [
      { id: 1, message: 'test action', created_at: '2017-11-22' },
    ];
  },
});

/* 1안 */
mounted: function() {
  this.$set(this.members[0], 'logs', []);
  this.members[0].logs = [...];
}

/* 2안 */
mounted: function() {
  this.members[0].logs = [];
  this.members[0].logs = [...];
  this.$forceUpdate();
}
참고
https://edu.goorm.io/lecture/18958/쉽게-배우는-vue-js-2-기초 https://kr.vuejs.org/ https://www.youtube.com/watch?v=sqH0u8wN4Rs https://kr.vuejs.org/v2/api/#search-form https://kr.vuejs.org/v2/style-guide/ https://vuex.vuejs.org/kr/ https://uxgjs.tistory.com/149
